Label Studio
How to run Label Studio (data labeling and annotation) in CGC with a volume and a PostgreSQL database, and how to use the ML backend for automatic pre-annotation.
The most flexible data labeling platform to fine-tune LLMs, prepare training data or validate AI models.
How to run it
Data Label Studio can help you annotate data with the use of AI. GPUs are used by the ML backend (autolabel-yolo), not by Label Studio itself - the label-studio template rejects -g. For automatic annotation, and streamlining the training process checkout ML backend section.
You also would like to create and mount volume for your data and postgress database to secure your work.
Create volume
cgc volume create label-studio-data -s 5 -sc <storage_class>
cgc volume create label-studio-db -s 1 -sc <storage_class>
Create database
cgc db create --name label-studio-db -c 1 -m 2 -v label-studio-db postgresql
Run Label Studio
<APP_TOKEN_DB> can be found using cgc db list -d command.
cgc compute create --name label-studio01 -c 8 -m 24 -v label-studio-data label-studio -e postgre_host=label-studio-db -e postgre_password=<APP_TOKEN_DB>
After the app is created, you can login into web interface based on information provided in the output.
URL and app_token can be found using cgc compute list -d command.
Admin login name is admin@localhost
Default configuration
LABEL_STUDIO_PASSWORD- The password for the Label Studio instance. This is set to CGC specificapp_tokenthat you receive after creating the compute instance.LABEL_STUDIO_DISABLE_SIGNUP_WITHOUT_LINK=true- Disables the signup option in Label Studio, ensuring that only users with a valid link can access the instance.LABEL_STUDIO_USERNAME=admin@localhost- The username for the Label Studio instance.JSON_LOG=1- Enables JSON logging for the Label Studio instance.DATA_UPLOAD_MAX_MEMORY_SIZE=1073741824- Sets the maximum memory size for data uploads to 1GB.
Optional parameters
POSTGRE_HOST- The host of the PostgreSQL database. If specified, it will set few other default environmental variables:POSTGRE_PASSWORD- The password for the PostgreSQL user. This is set to CGC specificapp_tokenthat you receive after creating the database.POSTGRE_USER=admin- The user for the PostgreSQL database.POSTGRE_PORT=5432- The port for the PostgreSQL database.POSTGRE_NAME=db- The name of the PostgreSQL database, within which Label Studio will store its data. It is not the same as the application name you provided when creating the database.DJANGO_DB=default- The database connection string for Django.
How to use Label Studio
Usage is really simple. If you know what it takes to label your data, exploration should not take more then 10 mins without any documentation. If you need help please visit the official documentation
How to use ML Backend in Label Studio
An ML backend is a tool that integrates machine learning models into the data annotation process. It assists by using existing models to pre-annotate data, which accelerates the workflow by providing initial labels for human annotators to review and refine.
Connect the model to your project
After you create a project, open the project settings in the top right corner and select Model.
Click Connect Model and complete the following fields:
| Field | Description |
|---|---|
| Name | Enter a name for the model. |
| Backend URL | Enter a URL for the model. Use the in-namespace address, for example http://auto-yolo:9090. |
| Select authentication method | No Authentication (default) or Basic Authentication, which adds user and password fields. The autolabel-yolo backend needs no authentication. |
| Any extra params to pass during model connection | Optional extra parameters sent to the backend when it is connected. |
| Interactive preannotations | Enable this option to allow the model to assist with the labelling process by providing real-time predictions or suggestions as annotators work on tasks. For more information, see Interactive pre-annotations. |
Confirm with Validate and Save - Label Studio contacts the backend right away and the model is listed only if it answers.
Pre-annotations/predictions
Get predictions from a model
After you connect a model to Label Studio, you can see model predictions in the labeling interface if the model is pre-trained, or right after it finishes training.
For a large dataset, the HTTP request to retrieve predictions might be interrupted by a timeout.
Available models
The following models are supported by ML backend.
- Pre-annotation column indicates if the model can be used for pre-annotation in Label Studio:
you can see pre-annotated data when opening the labeling page or after running predictions for a batch of data. - Training column indicates if the model can be used for training in Label Studio: update the model state based the submitted annotations.
| MODEL_NAME | Task | Pre-annotation | Training |
|---|---|---|---|
YOLOv8 (RectangleLabels) | Object detection. | ✅ | ❌ |
YOLOv8-seg (PolygonLabels) | Object segmentation. | ✅ | ❌ |
The autolabel-yolo image ships YOLOv8 weights only (yolov8n.pt, yolov8n-seg.pt, yolov8n-pose.pt,
yolov8n-obb.pt, yolov8n-cls.pt, yolov8m.pt) and control tags for RectangleLabels, PolygonLabels,
KeyPointLabels, Choices, VideoRectangle and TimelineLabels. Segment Anything is not part of the image.
Set up custom model in your project
You can find an instruction on how to load your custom model to ML Backend here.
When creating a project in Label Studio, start by selecting the desired labelling template during the Labelling Setup step.
For detection models, choose the "Object Detection with Bounding Boxes" template.
After selecting the template, add your label names in the Visual mode.
Next, switch to the Code mode and add the model_path attribute to the control tag you're using (e.g., RectangleLabels in this case).
This will link your custom model to the automated labelling process.
If your model is located directly in the root of the volume (e.g., <volume_name>/<your-model>.pt), you can simply specify the model's filename in the model_path, like so: model_path="<model_name>.pt".
However, if the model is stored within a subdirectory of the volume, you will need to provide the full path to the model file (e.g., model_path="<subdirectory_name>/<model_name>.pt").
You can also provide model_score_threshold to filter out predictions based on their confidence scores (default: model_score_threshold="0.5").
After completing these steps, your configuration should look like this:
<View>
  <Image name="image" value="$image"/>
  <RectangleLabels
          name="label" toName="image"
          model_path="my_custom_model.pt"
          model_score_threshold="0.6">
    <Label value="Cat"/>
    <Label value="Dog"/>
  </RectangleLabels>
</View>
If you already have created a project and want to connect custom model, go to the project Settings and select Labelling Interface.
Here you can configure your model using steps provided above.
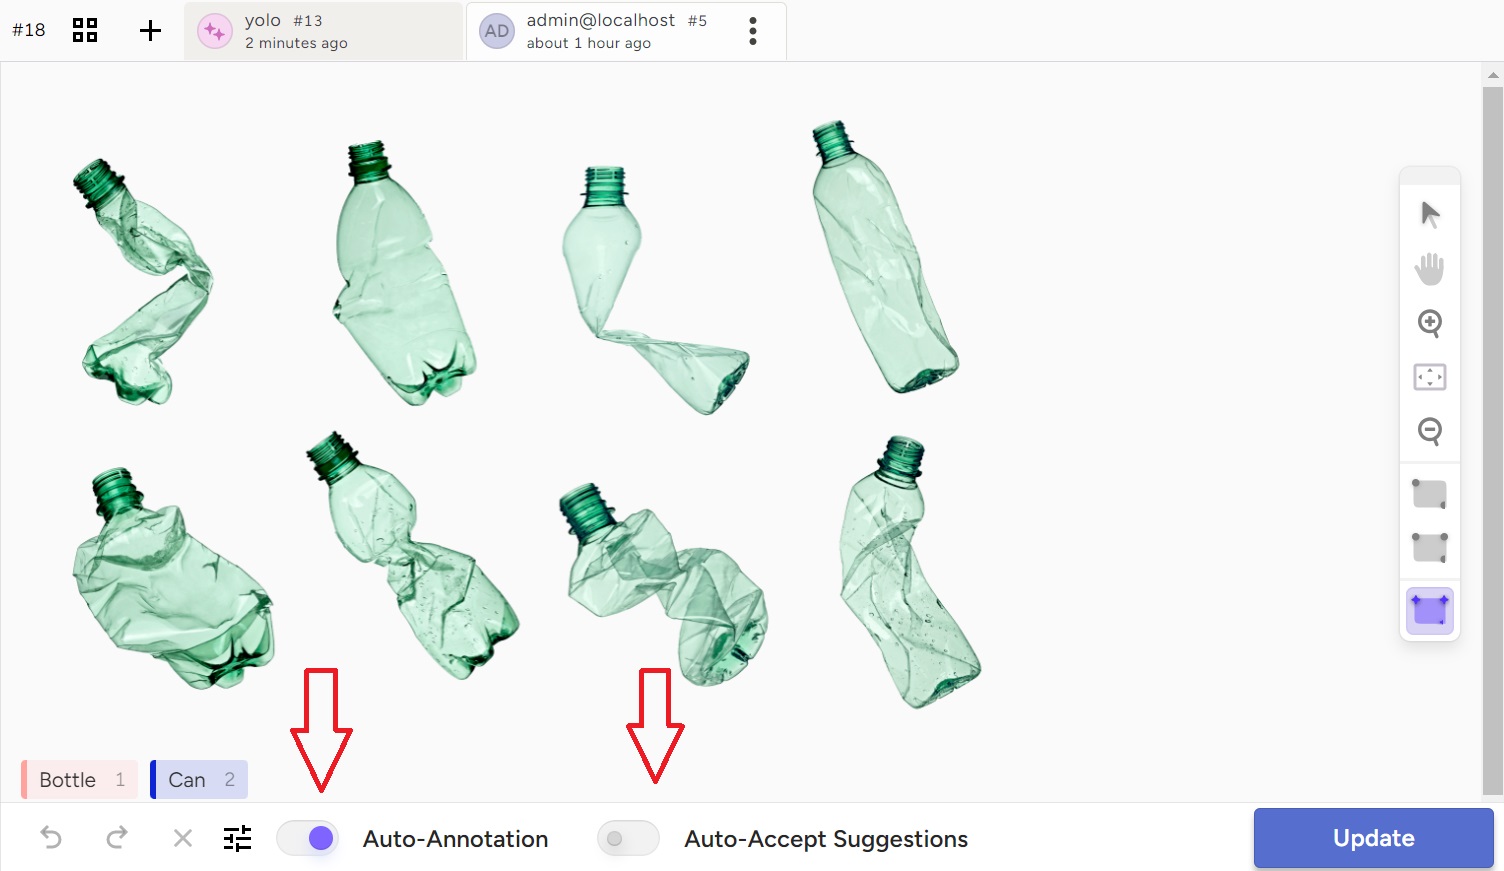
When labelling an image, make sure to enable the Auto-annotation button located at the bottom of the window to receive automated annotations from the model. Additionally, you can choose to enable Auto-accept Suggestions for a more streamlined workflow.
- If you enable
Auto-accept Suggestions, the annotation regions will appear automatically and be created immediately without further input. - If you do not enable
Auto-accept Suggestions, the suggested regions will still appear, but you will have the option to manually approve or reject them, either individually or all at once.
Feel free to experiment with these options, and remember that you can adjust them at any time to suit the needs of your project.
For more information on ML Backend you can visit the official documentation.