Vision API
The Vision API is an end-to-end computer vision service in CGC (object detection on images, videos and RTSP streams, powered by Triton); this page covers how to run it, how to use the API and troubleshooting.
CGC does not expose raw RTSP ingress ports for Vision API workloads. The Vision API can publish processed streams using RTSP, but the RTSP server/SFU must be reachable as an external TCP endpoint. For production RTSP streaming, the user should provide their own SFU server, for example MediaMTX, outside CGC or in infrastructure where a real RTSP TCP port can be exposed.
The external SFU must listen for RTSP publish/ingest traffic, typically on 8554/TCP, and must allow outbound connections from CGC workloads. Vision API acts as an RTSP client and pushes the processed stream to this SFU; it does not expose an RTSP server port inside CGC.
Overview
The Computer Vision API is intended to provide an end-to-end solution for computer vision tasks. It combines preprocessing, inference postprocessing and serving in one endpoint request. It uses Triton as inference source, combined with GPU accelerated image and video processing operations (bounding boxes, blur, Kalman filer, etc.). For serving streams it utilizes GPU accelerated Gstreamer pipelines.
Key Features:
- Image file as input, detection inference, processed image file as output
- Video file as input, detection inference, processed video file as output
- Stream as input, detection inference, processed RTSP stream as output
How to run
As Triton is an inference source you need to first ensure you have set it up Triton.
For now Vision API accepts only standard detection output [x1, x2, y1, y2, score, class_1, class_2 ..] if for some reason your model have different output, API won't accept it.
The Computer-Vision API is available as a compute resource, and it requires different amount of resources depending on the processing operations you chose and frame resolution of the source. However, the app will always require GPU that supports image processing operations. The best choice will be A5000. For a start we recommend 1.5 CPU core and 1.5 GB RAM per video/stream you will be processing. This numbers can grow as you add operations or bring higher resolution sources.
SFU Configuration Requirements
Vision API uses an external SFU/RTSP server, such as MediaMTX, for stream output. The application does not host a public RTSP endpoint in CGC. Instead, it processes frames and pushes the resulting stream to the configured SFU with GStreamer rtspclientsink over TCP.
The SFU must meet the following requirements:
- It must be reachable from CGC workloads over the network.
- It must listen on a real RTSP TCP ingest port, usually
8554/TCP. - Its firewall/security group must allow incoming connections from CGC egress addresses or from the public internet, depending on your setup.
- It must allow RTSP publishing to the configured path, for example
/vision-api/<stream_id>. - If authentication is enabled, credentials must match
SFU_AUTH_USERandSFU_AUTH_TOKEN. - Clients must read the output stream from the SFU, not from the Vision API CGC ingress.
Configure the following environment variables when creating the compute resource:
SFU_INTERNAL_SERVER_URL: RTSP base URL used by Vision API to publish processed streams to the SFU, for examplertsp://sfu.example.com:8554SFU_EXTERNAL_SERVER_URL: RTSP base URL returned to clients for viewing streams, for examplertsp://sfu.example.com:8554SFU_AUTH_USER: Username for SFU authenticationSFU_AUTH_TOKEN: Password/token for SFU authentication
For most external SFU setups, SFU_INTERNAL_SERVER_URL and SFU_EXTERNAL_SERVER_URL can point to the same RTSP base URL.
To run an instance, use the following command:
cgc compute create --name vision-api -c 8 -m 12 -g 1 -gt NVIDIA-RTX-A5000 vision-api \
  -e SFU_INTERNAL_SERVER_URL="rtsp://sfu.example.com:8554" \
  -e SFU_EXTERNAL_SERVER_URL="rtsp://sfu.example.com:8554" \
  -e SFU_AUTH_USER="your-auth-username" \
  -e SFU_AUTH_TOKEN="your-auth-token"
Volume Setup for Object Counter Statistics
If you plan to use the object counter feature and want to save statistics to files, you need to create and mount a volume:
# Create a volume for statistics (adjust size as needed)
cgc volume create -s 2 -sc <storage_class> stats

# Mount the volume to the Vision API compute resource
cgc volume mount stats -t vision-api -fp /app/stats
After initialization, your can access Swagger to view all endpoints at:
https://vision-api.<namespace>.cgc-waw-01.comtegra.cloud/docs
Default configuration
APP_TOKEN: The app token for the Computer Vision API. This is set to CGC specificapp_tokenthat you receive after creating the compute resource.SFU_INTERNAL_SERVER_URL: Internal RTSP URL for MediaMTX server (required)SFU_EXTERNAL_SERVER_URL: External RTSP URL for client access (required)SFU_AUTH_USER: Username for MediaMTX authentication (required, may be empty)SFU_AUTH_TOKEN: Authentication token for MediaMTX (required for secure streaming)STREAM_STATS_DIR: Directory path for saving object counter statistics (optional, defaults to "stats")
How to use
Every endpoint will require you to pass an app token as authorization. This is the same app token you can view with:
cgc compute list -d
As written in Key Features, there are 3 ways of using Computer Vision API depending on the desired input and output. The first 2 in which you can request a file as output will be similar in usage.
First you upload file to
/image/upload or /video/upload
and you will recive uuid that represents the source. Then you can include it in
image/to-image or video/to-video request.
Pay attention to request body:
{
  "source_file_uuid": "98ada9eb-daf6-4ee4-b4be-9fab7abdf619",
  "tritonServer": {
    "triton_url": "triton",
    "infer_model_name": "yolov8n",
    "version": "1"
  },
  "inference": {
    "confidence_threshold": 0.25,
    "iou_threshold": 0.45
  },
  "postprocess": {
    "bbox": {
      "apply": true,
      "rectangle_color": "default",
      "text_color": "default",
      "rectangle_thickness": 2,
      "text_size": 0.5,
      "text_thickness": 2,
      "include_text": false
    },
    "blur": {
      "apply": false,
      "blur_intensity": [99, 99],
      "classes": "auto",
      "partial_blur_classes": null
    },
    "pose": {
      "apply": true,
      "keypoints": {
        "apply": true,
        "keypoint_color": [0, 165, 255],
        "line_color": [255, 165, 0],
        "radius": 5,
        "line_thickness": 2
      },
      "pose_classifier": {
        "apply": true,
        "slope_threshold": 40,
        "fall_detector": {
          "apply": false,
          "alert_threshold": 2
        }
      }
    }
  },
  "output_format": "jpg"
}
Here you can pass received uuid and change anything you want about the inference and postprocessing. After you fill the payload, send the request and wait. Once the processing finished, you will receive a file containing processed image or video.
The third option which outputs a RTSP stream will require similar request, but will immediately return stream URLs. You can capture the stream using either the internal or external URL.
Once you don't need to stream anymore you can delete it passing stream_id to /stream/delete-stream.
There is also an info endpoint info/get-models that retrieves models available on Triton with information about them.
Additionally, there is a statistics endpoint /statistics/export that allows you to export object counter data collected during streaming. This endpoint accepts a stream_id and format (CSV or XLSX) to download the statistics file.
If you prefer to use api not via Swagger, you can make requests like:
curl -X 'POST' \
  'https://<appname>.<namespace>.cgc-waw-01.comtegra.cloud/video/to-stream' \
  -H 'accept: application/json' \
  -H 'app-token: 8d23ae613a4e46119f4d52cb25e8b551' \
  -H 'Content-Type: application/json' \
  -d '{
  "source_file_uuid": "ac839d89-14c7-4116-b5d8-30c34c714971",
  "tritonServer": {
    "triton_url": "triton",
    ...
  }
putting app_token in header, and params in body.
Detailed information
Optional app params
Additional optional parameters you can pass to create command in CLI:
STREAM_STATS_DIR- Directory path for saving object counter statistics. If not provided, statistics features must be disabled. Must be mounted volume path (e.g.,/app/stats).
Payload params
Payload has a couple of sections, beginning with Triton section, where we need to specify the host of triton. In the case of CGC, Triton deployed in the same namespace will be available under the container name for example: triton. Additionally, we select the model we want to use, its version, and the triton_request_concurrency, which is available exclusively for video endpoint and indicates how many clients will query Triton simultaneously. This is an example of a parameter that affects both the execution time of the query and resource consumption, which must be considered.
The inference section pertains to topics typical for model inference:
- confidence threshold
- intersection over union threshold
The stream/to-stream endpoint also includes encoder parameters, which define how the output stream should be encoded:
| Parameter | Default | Description | Notes |
|---|---|---|---|
bitrate | 800000 | The bitrate of the encoded stream, measured in bits per second (bps). | Higher bitrate improves quality but increases bandwidth usage. |
width | "default" | The width of the output video stream in pixels. | If "default", the original stream width is used. |
height | "default" | The height of the output video stream in pixels. | If "default", the original stream height is used. |
If custom width/height is provided, the frame is resized with optional padding to maintain aspect ratio.
The postprocess section concerns everything that happens after obtaining inference results. We can choose to overlay boxes in places where the model has successfully detected something, blur those areas, or use a Kalman filter to improve detection continuity.
Tracker Configuration
In addition to postprocess options like overlaying boxes, blurring areas, or using Kalman filters, users can modify tracker parameters to optimize detection precision and enhance the functionality of various features such as pose classification, object counting, and Kalman filtering for detection continuity. By experimenting with these parameters, users can fine-tune their application for better accuracy and reliability.
The following parameters are available for customization:
| Parameter | Default | Description | Notes |
|---|---|---|---|
track_activation_threshold | 0.25 | Detection confidence threshold for track activation. | Increasing this improves accuracy and stability but might miss true detections. Decreasing it increases completeness but risks noise and instability. |
lost_track_buffer | 30 | Number of frames to buffer when a track is lost. | Increasing this enhances occlusion handling, reducing track fragmentation or disappearance due to brief detection gaps. |
minimum_matching_threshold | 0.8 | Threshold for matching tracks with detections. | Increasing this improves accuracy but risks fragmentation. Decreasing it improves completeness but risks false positives and drift. |
frame_rate | "auto" | The frame rate of the video. If set to "auto," the frame rate is automatically extracted from the source. | Specify a fixed frame rate if the source frame rate is variable or unknown. |
minimum_consecutive_frames | 1 | Number of consecutive frames that an object must be tracked before it is considered a valid track. | Increasing this prevents accidental tracks from false or double detection but risks missing shorter tracks. |
Some information about the parameters was taken from the official documentation of the Supervision library.
Pose Estimation
Pose estimation can be configured by setting pose to true when using pose models.
The pose estimation section includes this set of parameters:
| Parameter | Default | Description | Note |
|---|---|---|---|
pose.apply | false | Enables or disables the pose estimation feature. | Set to true to activate pose estimation. Required when using pose estimation models. |
keypoints.apply | true | Enables or disables drawing of keypoints for human joints. | Keypoints represent detected joints. |
keypoints.keypoint_color | [0, 165, 255] | Sets the BGR color for keypoints. | [0, 165, 255] for blue. |
keypoints.line_color | [255, 165, 0] | Sets the BGR color for lines connecting keypoints. | [255, 165, 0] for yellow. |
keypoints.radius | 5 | Defines the radius of the keypoints in pixels. | Larger values increase visibility of keypoints on the frame. |
keypoints.line_thickness | 2 | Specifies the thickness of lines connecting keypoints in pixels. | Thicker lines improve visibility at higher frame resolutions. |
pose_classifier.apply | false | Enables or disables pose classification. | Available poses: Standing or Laying. |
pose_classifier.slope_threshold | 40 | Sets the degree for classifying pose as laying. | Adjust to fine-tune pose classification accuracy. |
fall_detector.apply | false | Enables or disables fall detection. | Fall detection alerts can be useful in safety-critical applications. |
fall_detector.alert_threshold | 2 | Defines the time threshold (in seconds) for triggering a fall alert. | Lower values make the fall detection more sensitive; adjust based on specific requirements. By default, if a person was laying for two seconds the fall alert will be triggered. |
When using pose estimation models, it is required to set the pose parameter to true for proper functionality.
At the moment pose estimation feature only supports YOLO-Pose models with 17 COCO keypoints.
Object Counting
The Object Counting feature enables counting of specific object classes as they move across a dividing line in a video frame. This is particularly useful for scenarios like monitoring traffic flow, counting people or objects, and analyzing movement patterns.
The following parameters are available for configuring the Object Counting feature:
| Parameter | Default | Description | Note |
|---|---|---|---|
apply | true | Enables or disables the object counting feature. | Set to true to activate object counting. |
line_type | "axis" | Defines the type of line to use for object counting. Choose "axis" for a horizontal/vertical line or "custom" for a manually specified line. | If "axis" is chosen you need to specify the axis (in axis parameter) on which the line will be drawn. If "custom" is chosen - specify line_start and line_end parameters. |
axis | "x" | Determines the axis on which the dividing line is drawn. Used only when line_type="axis". | Choose "x" for a vertical line or "y" for a horizontal line. |
position | "1/2" | Specifies the position of the dividing line on the chosen axis. Used only when line_type="axis". | Accepts an integer (pixel position) or a fraction as a string ("1/2" for middle of a frame). |
line_start | [null, null] | Defines the starting point of a custom line. Used only when line_type="custom". | Provide coordinates for starting point of the custom line, e.g., [x, y]. See how... |
line_end | [null, null] | Defines the endpoint of a custom line. Used only when line_type="custom". | Provide coordinates for ending point of the custom line, e.g., [x, y]. See how... |
class_id_map | {"person": 0} | Maps object class names to their corresponding class IDs. | At least one class must be specified. Use Netron app to determine class IDs if unsure. |
draw_counts | true | Displays the count of objects on either side of the dividing line. | Shows how many objects of each class crossed the line in both directions. |
draw_dividing_line | true | Draws the dividing line on the frame. | Useful for visually identifying where objects are counted. |
line_color | [255, 255, 255] | Sets the BGR color of the dividing line. | [255, 255, 255] for a white line. |
line_thickness | 2 | Defines the thickness of the dividing line. | Adjust for better visibility depending on the resolution of the video frame. |
How to Specify Coordinates for line_start and line_end
When defining the starting and ending points for a custom line, you need to provide coordinates as [x, y]. These coordinates represent positions within the video frame or image grid. Here’s how the coordinate system works:
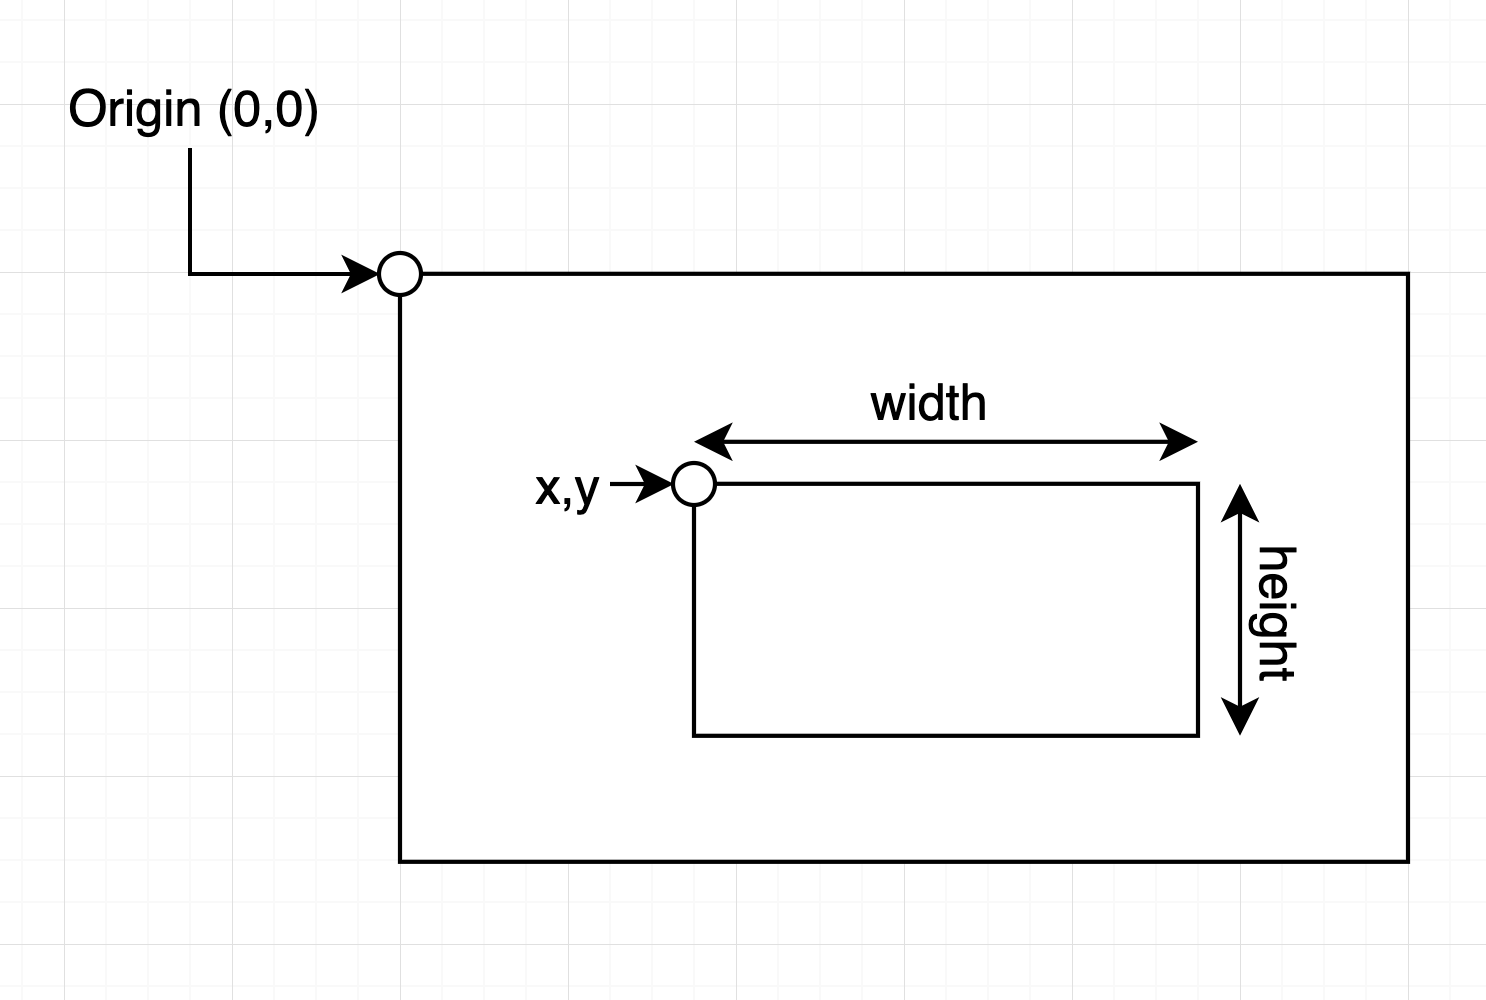
- Top-Left Corner: The top-left corner of the frame is the point
(0, 0). - Horizontal (X) Axis: The
xcoordinate increases as you move to the right across the frame, which represents the width of the frame. - Vertical (Y) Axis: The
ycoordinate increases as you move downward across the frame, which represents the height of the frame.
For example:
line_start: Specifies the starting point of the line. For instance,[0, 1080]would place the start at the bottom-left corner of a 1920x1080 frame.line_end: Specifies the endpoint of the line. For instance,[1920, 0]would place the end at the top-right corner of a 1920x1080 frame.
Enhanced Blur Configuration
The blur feature has been enhanced with new capabilities for more precise blurring control:
| Parameter | Default | Description | Note |
|---|---|---|---|
apply | false | Enables or disables the blur feature. | Set to true to activate blurring. |
blur_intensity | [99, 99] | Defines the blur kernel size as [width, height]. | Both values must be odd numbers between 1-100. Higher values create stronger blur effects. |
classes | "auto" | Specifies which object classes to blur. | Use "auto" to blur all detected classes, or provide a list of class IDs like [0, 1, 2]. |
partial_blur_classes | null | Configuration for partial blurring within bounding boxes. | Optional configuration object for advanced blur control within specific regions of detected objects. |
Partial Blur Configuration:
When partial_blur_classes is provided, it should contain:
blur_region: Which part of the bounding box to blur ("top","bottom","left","right","center")blur_percentage: What percentage of the box to blur (between 0.1 and 1.0)
Example partial blur configuration:
"partial_blur_classes": {
  "blur_region": "bottom",
  "blur_percentage": 0.3
}
Statistics and Data Export
The Vision API now includes a comprehensive statistics system for object counting data:
| Feature | Description | Requirements |
|---|---|---|
write_statistics | Enables saving of object counter statistics to files. | Requires mounted volume at /app/stats path. Set to true in object_counter configuration. |
| Statistics Export | Export collected statistics in CSV or XLSX format. | Use /statistics/export endpoint with stream_id and desired format. |
| Real-time Tracking | Statistics are saved in real-time as objects cross counting lines. | Data includes timestamps, object types, crossing directions, and counts. |
To enable statistics collection:
- Mount a volume for statistics storage (see volume setup instructions above)
- Set
write_statistics: truein theobject_counterconfiguration - Use
/statistics/exportendpoint to download collected data
Each option has its sub-options that modify their behavior. Again, it is important to remember that the more postprocessing we add, the longer the query will take and the more resources it will consume. All options except boxes are not applied by default. In case of colors, the default option - "default" means that every class detected will have different random color assigned to it. If you want a certain color you can pass in form of RGB array - ex.: [255, 0, 0], then EVERY class will be this color. This can be useful when you have only 1 or couple classes.
Finally, there is the output format. Currently, only one format is implemented, so the default setting should not be changed.
RTSP streams
The stream/to-stream endpoint processes an input stream and publishes the processed output to the configured SFU.
Flow:
input stream -> Vision API in CGC -> RTSP publish to external SFU -> client reads from SFU
Vision API does not need an exposed RTSP port. It opens an outbound TCP connection to SFU_INTERNAL_SERVER_URL and publishes the stream there. The returned external_stream_url should be used by clients to read the stream from the SFU.
CGC ingress cannot be used as a public RTSP endpoint for rtsp://... playback. If a client requires RTSP output, they must provide an SFU/RTSP server with a reachable listening RTSP TCP port.
Common Errors and Troubleshooting
This section provides information on where errors are returned during processing and how to interpret them. Understanding the error messages and their causes will help quickly resolve issues and ensure smooth operation.
Error Locations
Most errors will be visible in Responses > Server Response. Detailed information about the errors can be found in the Response Body part of the server response.
For example, an error for a non-existing video file (which can occur when the source_file_uuid parameter is incorrect) will be displayed as follows:
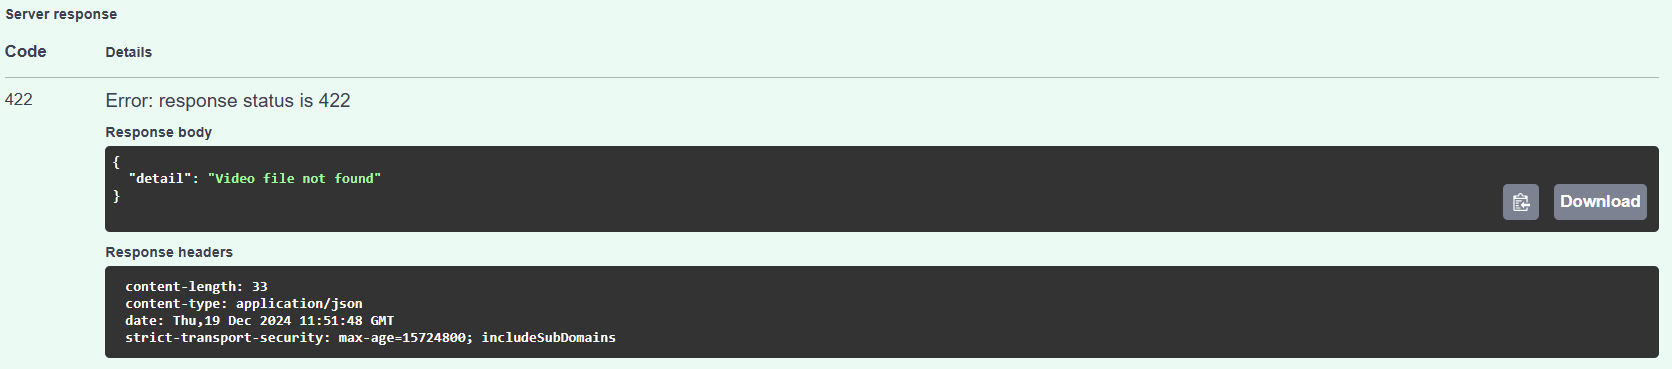
Errors in Parameters
When there are issues with the parameters provided, the errors will include detailed messages about what went wrong. Below is an example of such an error:
{
  "detail": [
    {
      "type": "value_error",
      "loc": [
        "body",
        "postprocess",
        "pose",
        "pose_classifier",
        "slope_threshold"
      ],
      "msg": "Value error, Slope threshold must be between 0 and 90 degrees",
      "input": 150,
      "ctx": {
        "error": {}
      },
      "url": "https://errors.pydantic.dev/2.10/v/value_error"
    }
  ]
}
In this example:
- Error Description: The
slope_thresholdparameter was provided with an incorrect value (150). - Cause: The valid range for
slope_thresholdis between 0 and 90 degrees. - Solution: Update the
slope_thresholdvalue to fall within the acceptable range.
The error response includes:
- Type: Indicates the type of error, such as
value_error. - Location (
loc): Shows where the error occurred in the parameter hierarchy. - Message (
msg): Provides a clear description of the error. - Input: Displays the invalid value provided.
- URL: Links to documentation for further details on the error type.
Pose Model Error
If the following error is encountered:
RuntimeError encountered during pose estimation: shape '[1, 17, 3]' is invalid for input of size 0. Are you sure you are using a pose estimation model?
It indicates that the pose feature was applied, but the model being used does not support pose estimation.
Solution:
- Change the model to one that supports pose estimation (see how to configure).
- Alternatively, disable the
posefeature by settingapplytofalsein the pose section of the parameters.
SFU Configuration Errors
With the SFU-based streaming, you may encounter specific configuration errors:
SFU Authentication Error:
SFU_AUTH_TOKEN environment variable must be set for authenticated streaming
Solution: Ensure you provide the SFU_AUTH_TOKEN when creating the compute resource.
SFU Configuration Error:
SFU_INTERNAL_SERVER_URL environment variable must be set for streaming
SFU_EXTERNAL_SERVER_URL environment variable must be set for client access
Solution: Provide both SFU URL environment variables with valid RTSP URLs (must start with rtsp://).
Statistics Volume Error: If object counter statistics are enabled but volume is not mounted, you may see errors related to file writing. Solution: Ensure you've created and mounted the stats volume as described in the setup section.
The stream/to-stream endpoint now returns both internal and external stream URLs. If the returned URLs are not working, you can troubleshoot by checking the logs and potential errors using the following command:
cgc logs <vision-api-compute-resource-name>
As the example setup provided above the command would look as follows:
cgc logs vision-api
This will provide detailed logs for the Vision API compute resource, helping users diagnose and resolve issues related to SFU streaming.
Because the streaming endpoint operates in a multiprocessing environment, errors may not surface immediately and may require some time to appear in CGC.